Quickstart Feature Flags
On this page you will integrate your web application with Nblocks Feature Flags. This allows you to conditionally give access to or show / hide features or content to your users.
Some use cases for feature flags are:
- Restrict access to premium content that just users with a certain plan can access
- Try beta features on a selection of customers
- Show a message to all users during a scheduled release.
- Protect a feature with Role based access controll (RBAC).
The content of this quickstart
- First we'll go through how you will apply a few lines of code to conditionally show content in your app.
- Then we'll create the flags for the features in Nblocks Admin with conditions that should apply to it.
- If you haven't already, sign up for Nblocks and get access to your app id
- Completed the Quickstart since we'll be using the magic of access tokens in this quickstart
Integrating in your code
The integration essentially consists of requesting an evaluation of a flag by providing information about the current user and then handling the evaluation response. For the purpose of this quickstart we'll attach the user access token that will have Nblocks automatically resolve all the information that's necessary for evaluating a flag.
The evaluation endpoint URL consists of your app id and the flag key you wish to evaluate.
The url can look like this: https://backendless.nblocks.cloud/flags/evaluate/APP_ID/FLAG_KEY
And the response looks like this:
{
    "enabled": true
}
Now, let's integrate this into our app!
Example code
- ReactJS
- ReactJS (vanilla)
- NextJS
- Java
- If you haven't already, install the Nblocks react plugin
npx @nebulr-group/nblocks-cli setup-react
- Add the NblocksProvider
Add the NblocksProvider to your top most component, e.g. the App component and wrap the rest of your app as children.
import { NblocksProvider } from '@nebulr-group/nblocks-react';

export default function App() {
  return (
    <NblocksProvider config={{ appId: 'XXX'  /* Replace this with your own APP ID */ }}>
      ... App components ...
    </NblocksProvider>
  );
}
- Use the FeatureFlag Component
Imagine you have a component that looks something like this:
// We just want to render this for premium customers
<span>Premium content</span>

// We just want to render this for admins
<a href="/beta">Button to admin features</a>

// We just want to render this if we're doing a release
<h1>We're currently doing a release and will be back soon</h1>
Now you can use the FeatureFlagComponent from the plugin to conditionally show these components in your React app.
import { FeatureFlagComponent } from '@nebulr-group/nblocks-react';

<FeatureFlagComponent flagKey="premium-features">
    <span>Premium content</span>
</FeatureFlagComponent>
<FeatureFlagComponent flagKey="admin-features">
    <a href="/beta">Button to admin features</a>
</FeatureFlagComponent>
<FeatureFlagComponent flagKey="release-announcement">
    <h1>We're currently doing a release and will be back soon</h1>
</FeatureFlagComponent>
Imagine you have a component that looks something like this:
// We just want to render this if we're doing a release
<h1>We're currently doing a release and will be back soon</h1>

// We just want to render this for premium customers
<span>This is premium content</span>

// We just want to render this for beta customers
<a href="/beta">Button to beta feature</a>
To conditionally render these different elements we can create a simple component.
Name this component FeatureFlags.
import { useEffect, useState } from 'react';

// The component takes the prop flag.
export default function FeatureFlag({ flag, children }) {

    // Replace this with your own APP ID
  const APP_ID = 'XXX';

  // This will be our variable telling if the feature is enabled or and we should render the component children
  // Initially this variable is false
  const [enabled, setEnabled] = useState(false);

  useEffect(() => {
    // Evaluate the flag
    const accessToken = window.localStorage.getItem('access_token');
    if (accessToken) {
      evaluate(accessToken);
    }
  }, []);

  const evaluate = async (accessToken) => {
    const result = await fetch(
      `https://backendless.nblocks.cloud/flags/evaluate/${APP_ID}/${flag}`,
      {
        method: 'POST',
        headers: {
          'Content-Type': 'application/json',
        },
        body: JSON.stringify({
          accessToken,
        }),
      }
    ).then((res) => res.json());
    setEnabled(result.enabled);
  };

  // Only if enabled should we render the component children
  if (enabled) return children;
  else return '';
}
Now we can use this component anywhere in your app to conditionally show content like pages or buttons in our React app. Like this, where the changes are highlighted:
<FeatureFlag flag="release-announcement">
    <h1>We're currently doing a release and will be back soon</h1>
</FeatureFlag>
<FeatureFlag flag="premium">
    <span>This is premium content</span>
</FeatureFlag>
<FeatureFlag flag="beta-feature">
    <a href="/beta">Button to beta feature</a>
</FeatureFlag>
Imagine you have a NextJS page component that contains elements like this:
// We just want to render this if we're doing a release
<h1>We're currently doing a release and will be back soon</h1>

// We just want to render this for premium customers
<span>This is premium content</span>

// We just want to render this for beta customers
<a href="/beta">Button to beta feature</a>
To conditionally render these different elements we can create a simple component.
Name this component FeatureFlags.
'use client'

import React, { useEffect, useState } from 'react';

// The component takes the prop flag.
export default function FeatureFlag({ flag, children}) {

    // Replace this with your own APP ID
  const APP_ID = 'XXX';

  // This will be our variable telling if the feature is enabled or and we should render the component children
  // Initially this variable is false
  const [enabled, setEnabled] = useState(false);

  useEffect(() => {
    // Evaluate the flag
    const accessToken = window.localStorage.getItem('access_token');
    if (accessToken) {
      evaluate(accessToken);
    }
  }, []);

  const evaluate = async (accessToken) => {
    const result = await fetch(
      `https://backendless.nblocks.cloud/flags/evaluate/${APP_ID}/${flag}`,
      {
        method: 'POST',
        headers: {
          'Content-Type': 'application/json',
        },
        body: JSON.stringify({
          accessToken,
        }),
      }
    ).then((res) => res.json());
    setEnabled(result.enabled);
  };

  // Only if enabled should we render the component children
  if (enabled) return children;
  else return '';
}
Now we can use this component anywhere in your app to conditionally show content like pages or buttons in our app. Like this, where the changes are highlighted:
<FeatureFlag flag="release-announcement">
    <h1>We're currently doing a release and will be back soon</h1>
</FeatureFlag>
<FeatureFlag flag="premium">
    <span>This is premium content</span>
</FeatureFlag>
<FeatureFlag flag="beta-feature">
    <a href="/beta">Button to beta feature</a>
</FeatureFlag>
Imagine you're developing a new AI-model, and want to easily switch between the new and the old model:
if (useNewModel) {
    // Logic for new model
    response.getWriter().write("Running new model");
    return;
} else {
    // Logic for old model
    response.getWriter().write("Running old model");
    return;
}
To conditionally run the new model, we can create a new class called FeatureFlags:
package com.mycompany.app;

import java.io.IOException;
import java.net.URI;
import java.net.http.HttpClient;
import java.net.http.HttpRequest;
import java.net.http.HttpResponse;
import org.json.JSONObject;

import javax.servlet.ServletException;
import javax.servlet.http.HttpServletRequest;
import javax.servlet.http.HttpServletResponse;

public class FeatureFlag {

    // Replace this with your own APP ID
    private static final String APP_ID = "XXX";

    private static final String FEATURE_FLAG_URL = "https://backendless.nblocks.cloud/flags/evaluate/" + APP_ID + "/";

    public static Boolean evaluateFlag(String flagId, HttpServletRequest request, HttpServletResponse response)
            throws ServletException, IOException {
        try {
            // Extract the access token from the Authorization header
            String authHeader = request.getHeader("Authorization");
            String accessToken = authHeader.substring("Bearer ".length());

            // Prepare the request
            JSONObject requestBody = new JSONObject().put("accessToken", accessToken);

            HttpRequest flagsRequest = HttpRequest.newBuilder()
                    .uri(URI.create(FEATURE_FLAG_URL + flagId))
                    .header("Content-Type", "application/json")
                    .POST(HttpRequest.BodyPublishers.ofString(requestBody.toString()))
                    .build();

            // Send the request
            HttpClient client = HttpClient.newHttpClient();

            HttpResponse<String> flagResponse = client.send(flagsRequest, HttpResponse.BodyHandlers.ofString());
            // Extract flag status from response
            String flagResponseBody = flagResponse.body();
            JSONObject flag = new JSONObject(flagResponseBody);

            return flag.getBoolean("enabled");
        } catch (Exception e) {
            e.printStackTrace();
            return false;
        }
    }
}
Now we can use the evaluateFlag method anywhere in your app to conditionally run operations, such as the new model.
Like in this ModelServlet:
package com.mycompany.app;

import java.io.IOException;

import javax.servlet.ServletException;
import javax.servlet.http.HttpServlet;
import javax.servlet.http.HttpServletRequest;
import javax.servlet.http.HttpServletResponse;

public class ModelServlet extends HttpServlet {
    @Override
    protected void doGet(HttpServletRequest request, HttpServletResponse response)
            throws ServletException, IOException {
        try {
            Boolean useNewModel = FeatureFlag.evaluateFlag("new-model", request, response);
            if (useNewModel) {
                // Logic for new model
                response.getWriter().write("Running new model");
                return;
            } else {
                // Logic for old model
                response.getWriter().write("Running old model");
                return;
            }
        } catch (Exception e) {
            e.printStackTrace();
        }
    }
}
Now when we have the flag names sorted out and integrated in the code we can go ahead and create them in Nblocks Admin.
Managing flags in Nblocks Admin
When signing up for Nblocks you also got access to Nblocks Admin where you can customize and make changes to your app configuration and access other features.
Go to Nblocks Admin and login.
In this part we'll be creating a feature flag that matches your flag ID in code and define who should have access to it
Step 1. Create flag
Click the flags tab and create a new flag. Call it "beta-feature" since this is the flag we expect to evaluate in our code.
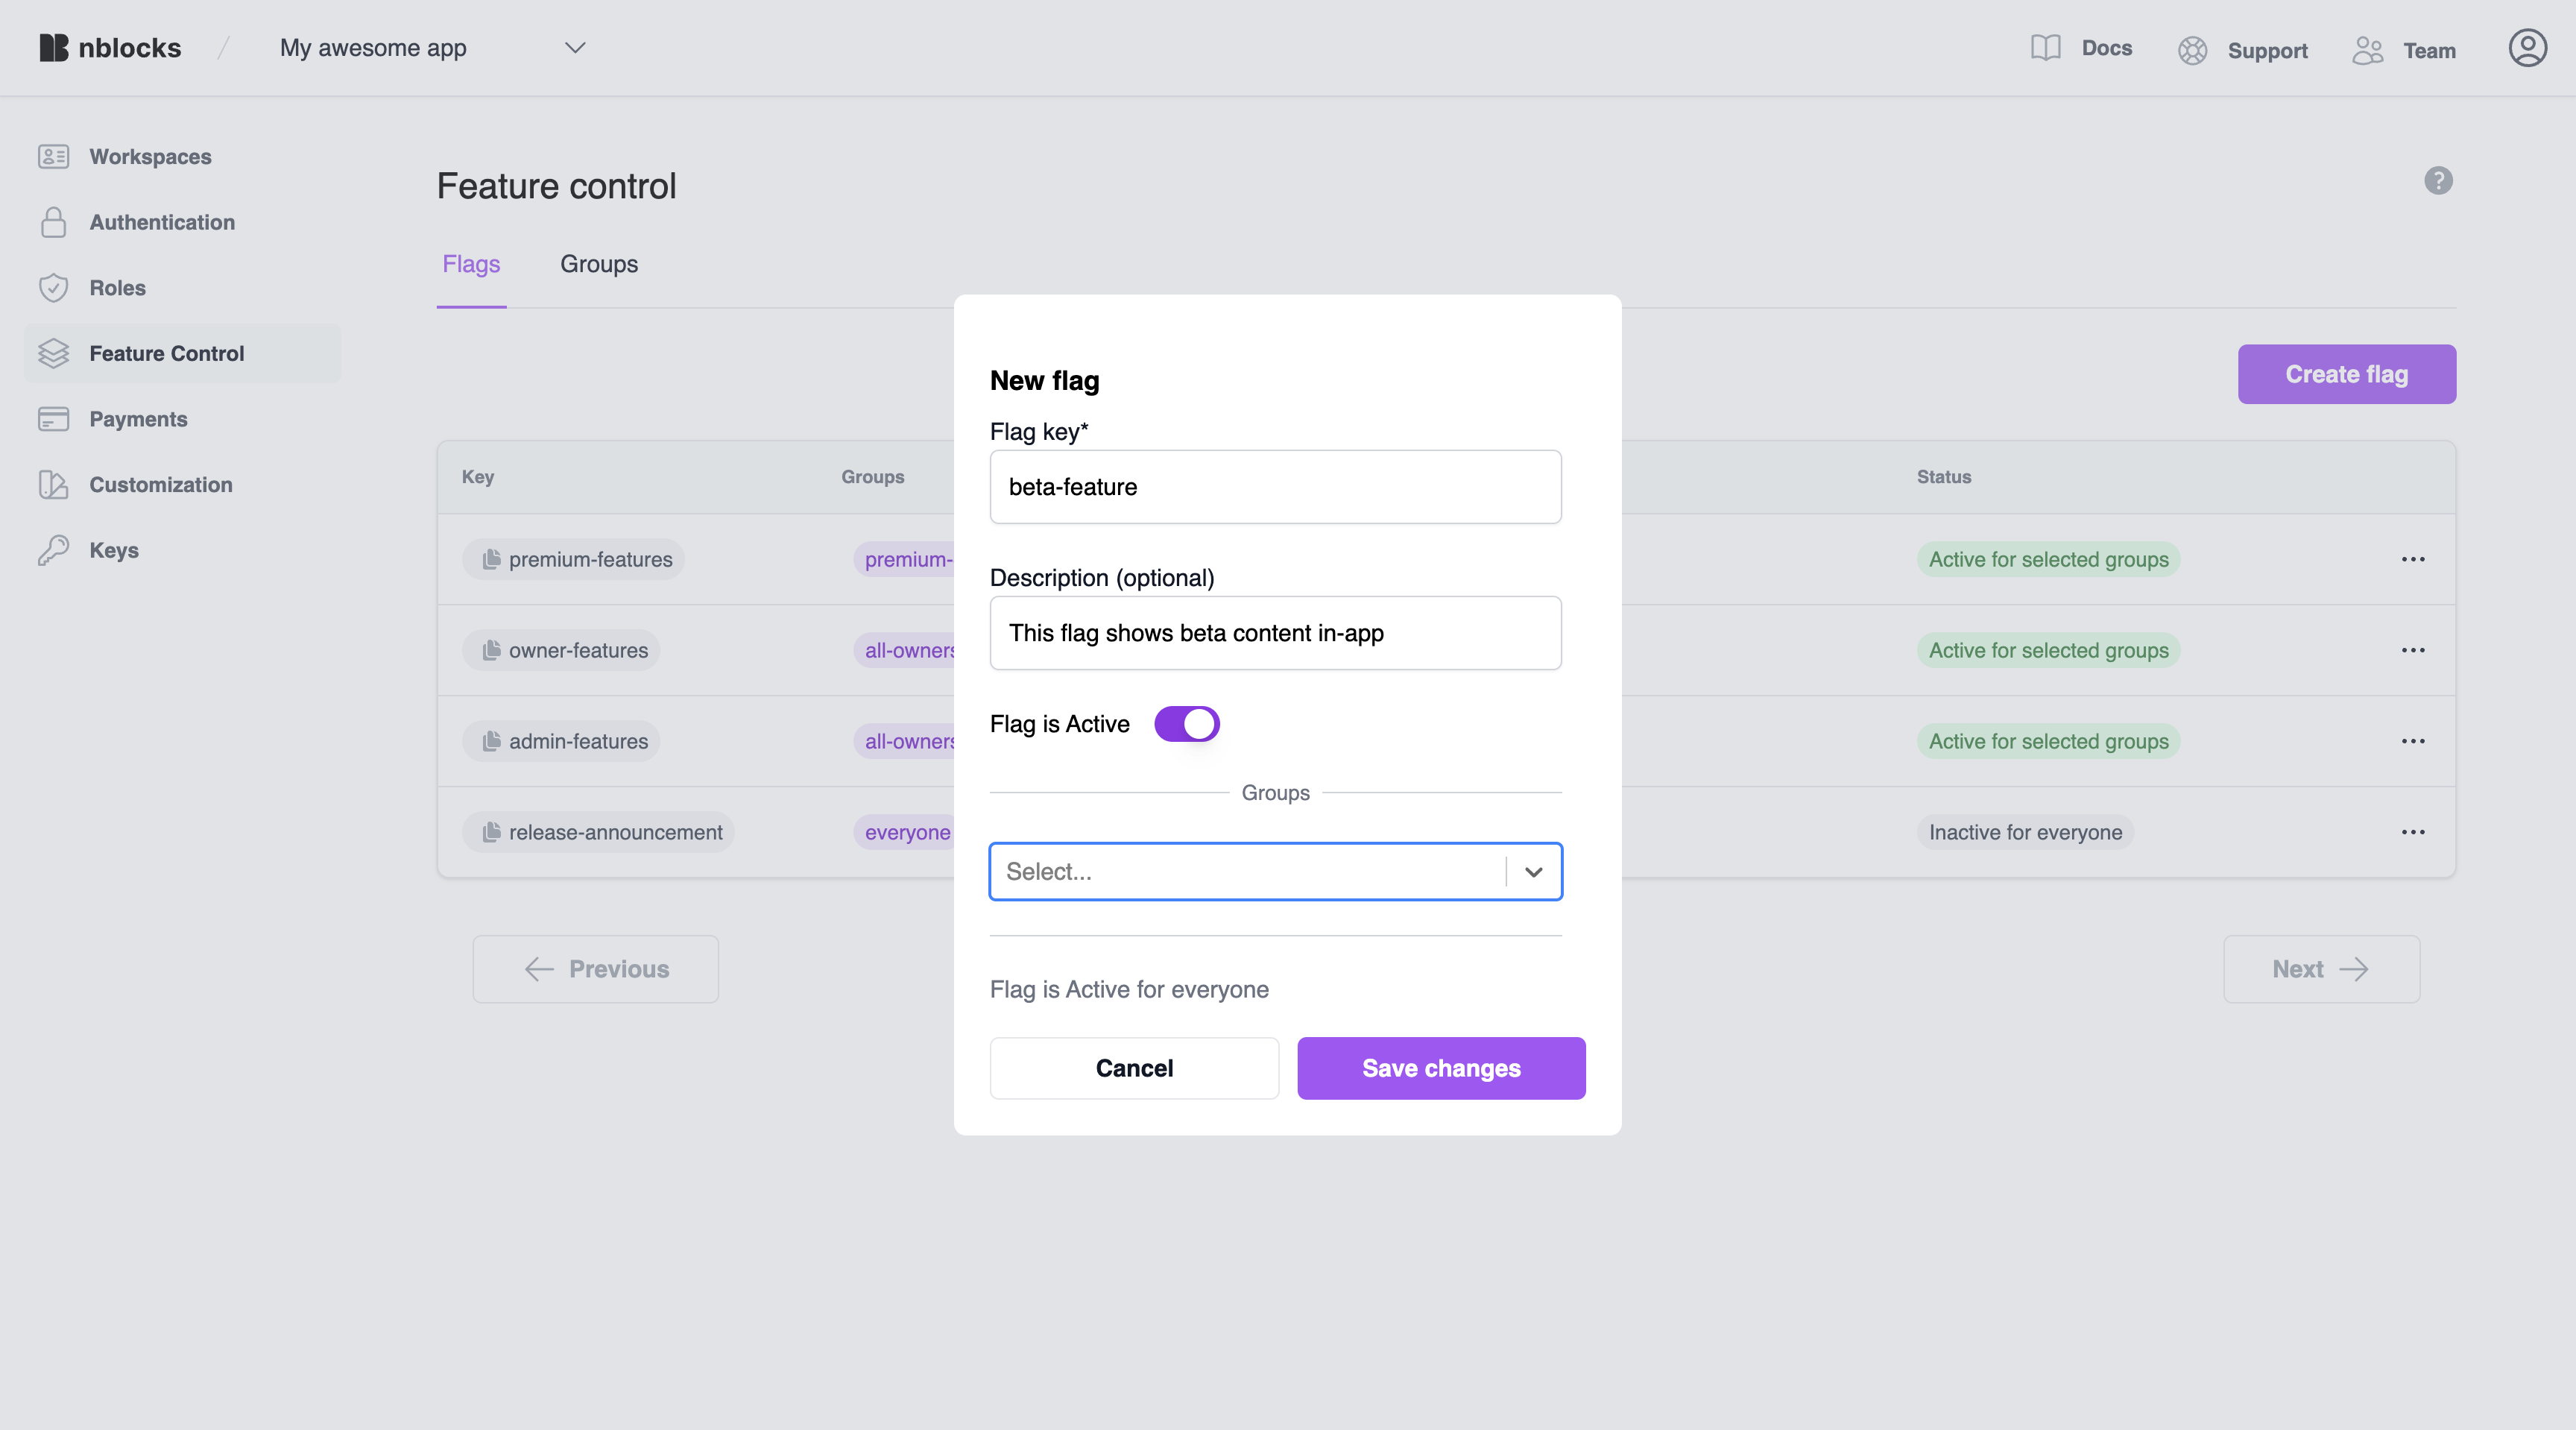
Now let's add conditions to this flag so it can be evaluated when the right user tries accessing it.
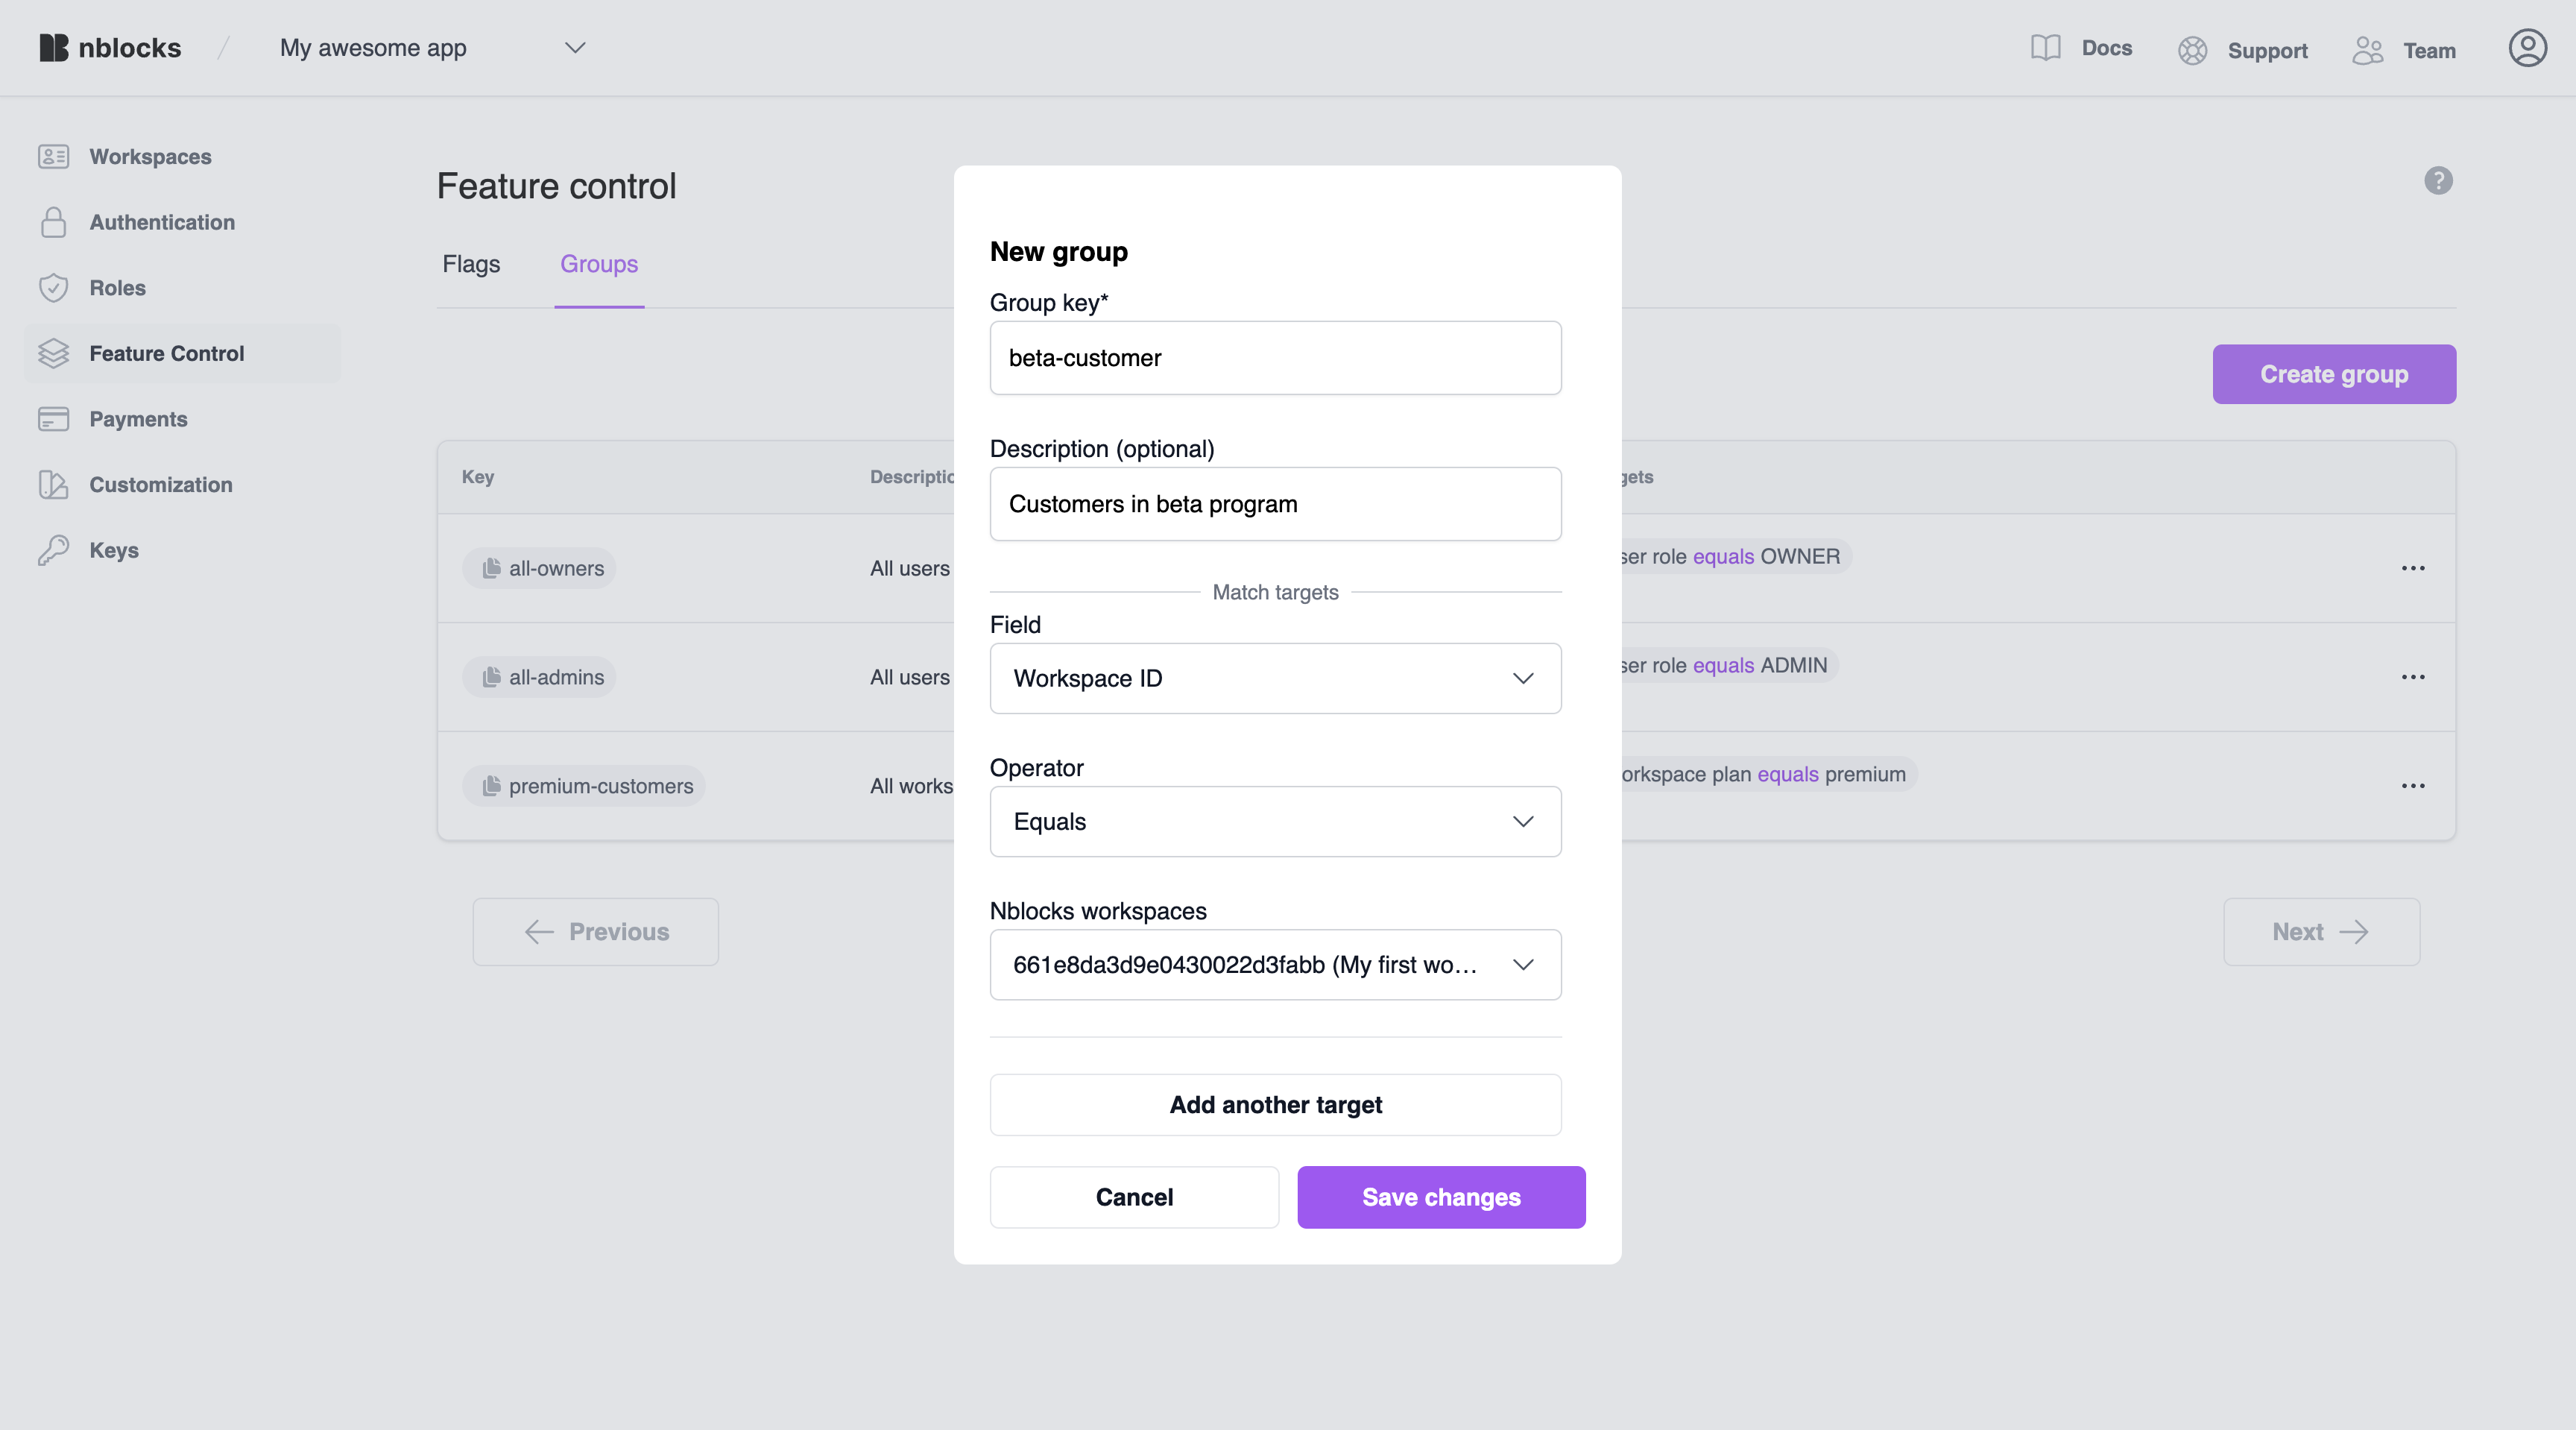
Step 2. Create group
With groups we can build reusable conditions that can be attached to our different feature flags. Think of this as you'd want to target an individual tenant, user or a group of roles. That's what groups are for.
Navigate to Feature flags and click the groups tab. Click add group and name it "beta-customer" and specify to match on "Workspace ID" using the operator "Equals" and choose one of the current tenants that has signed up for your app.
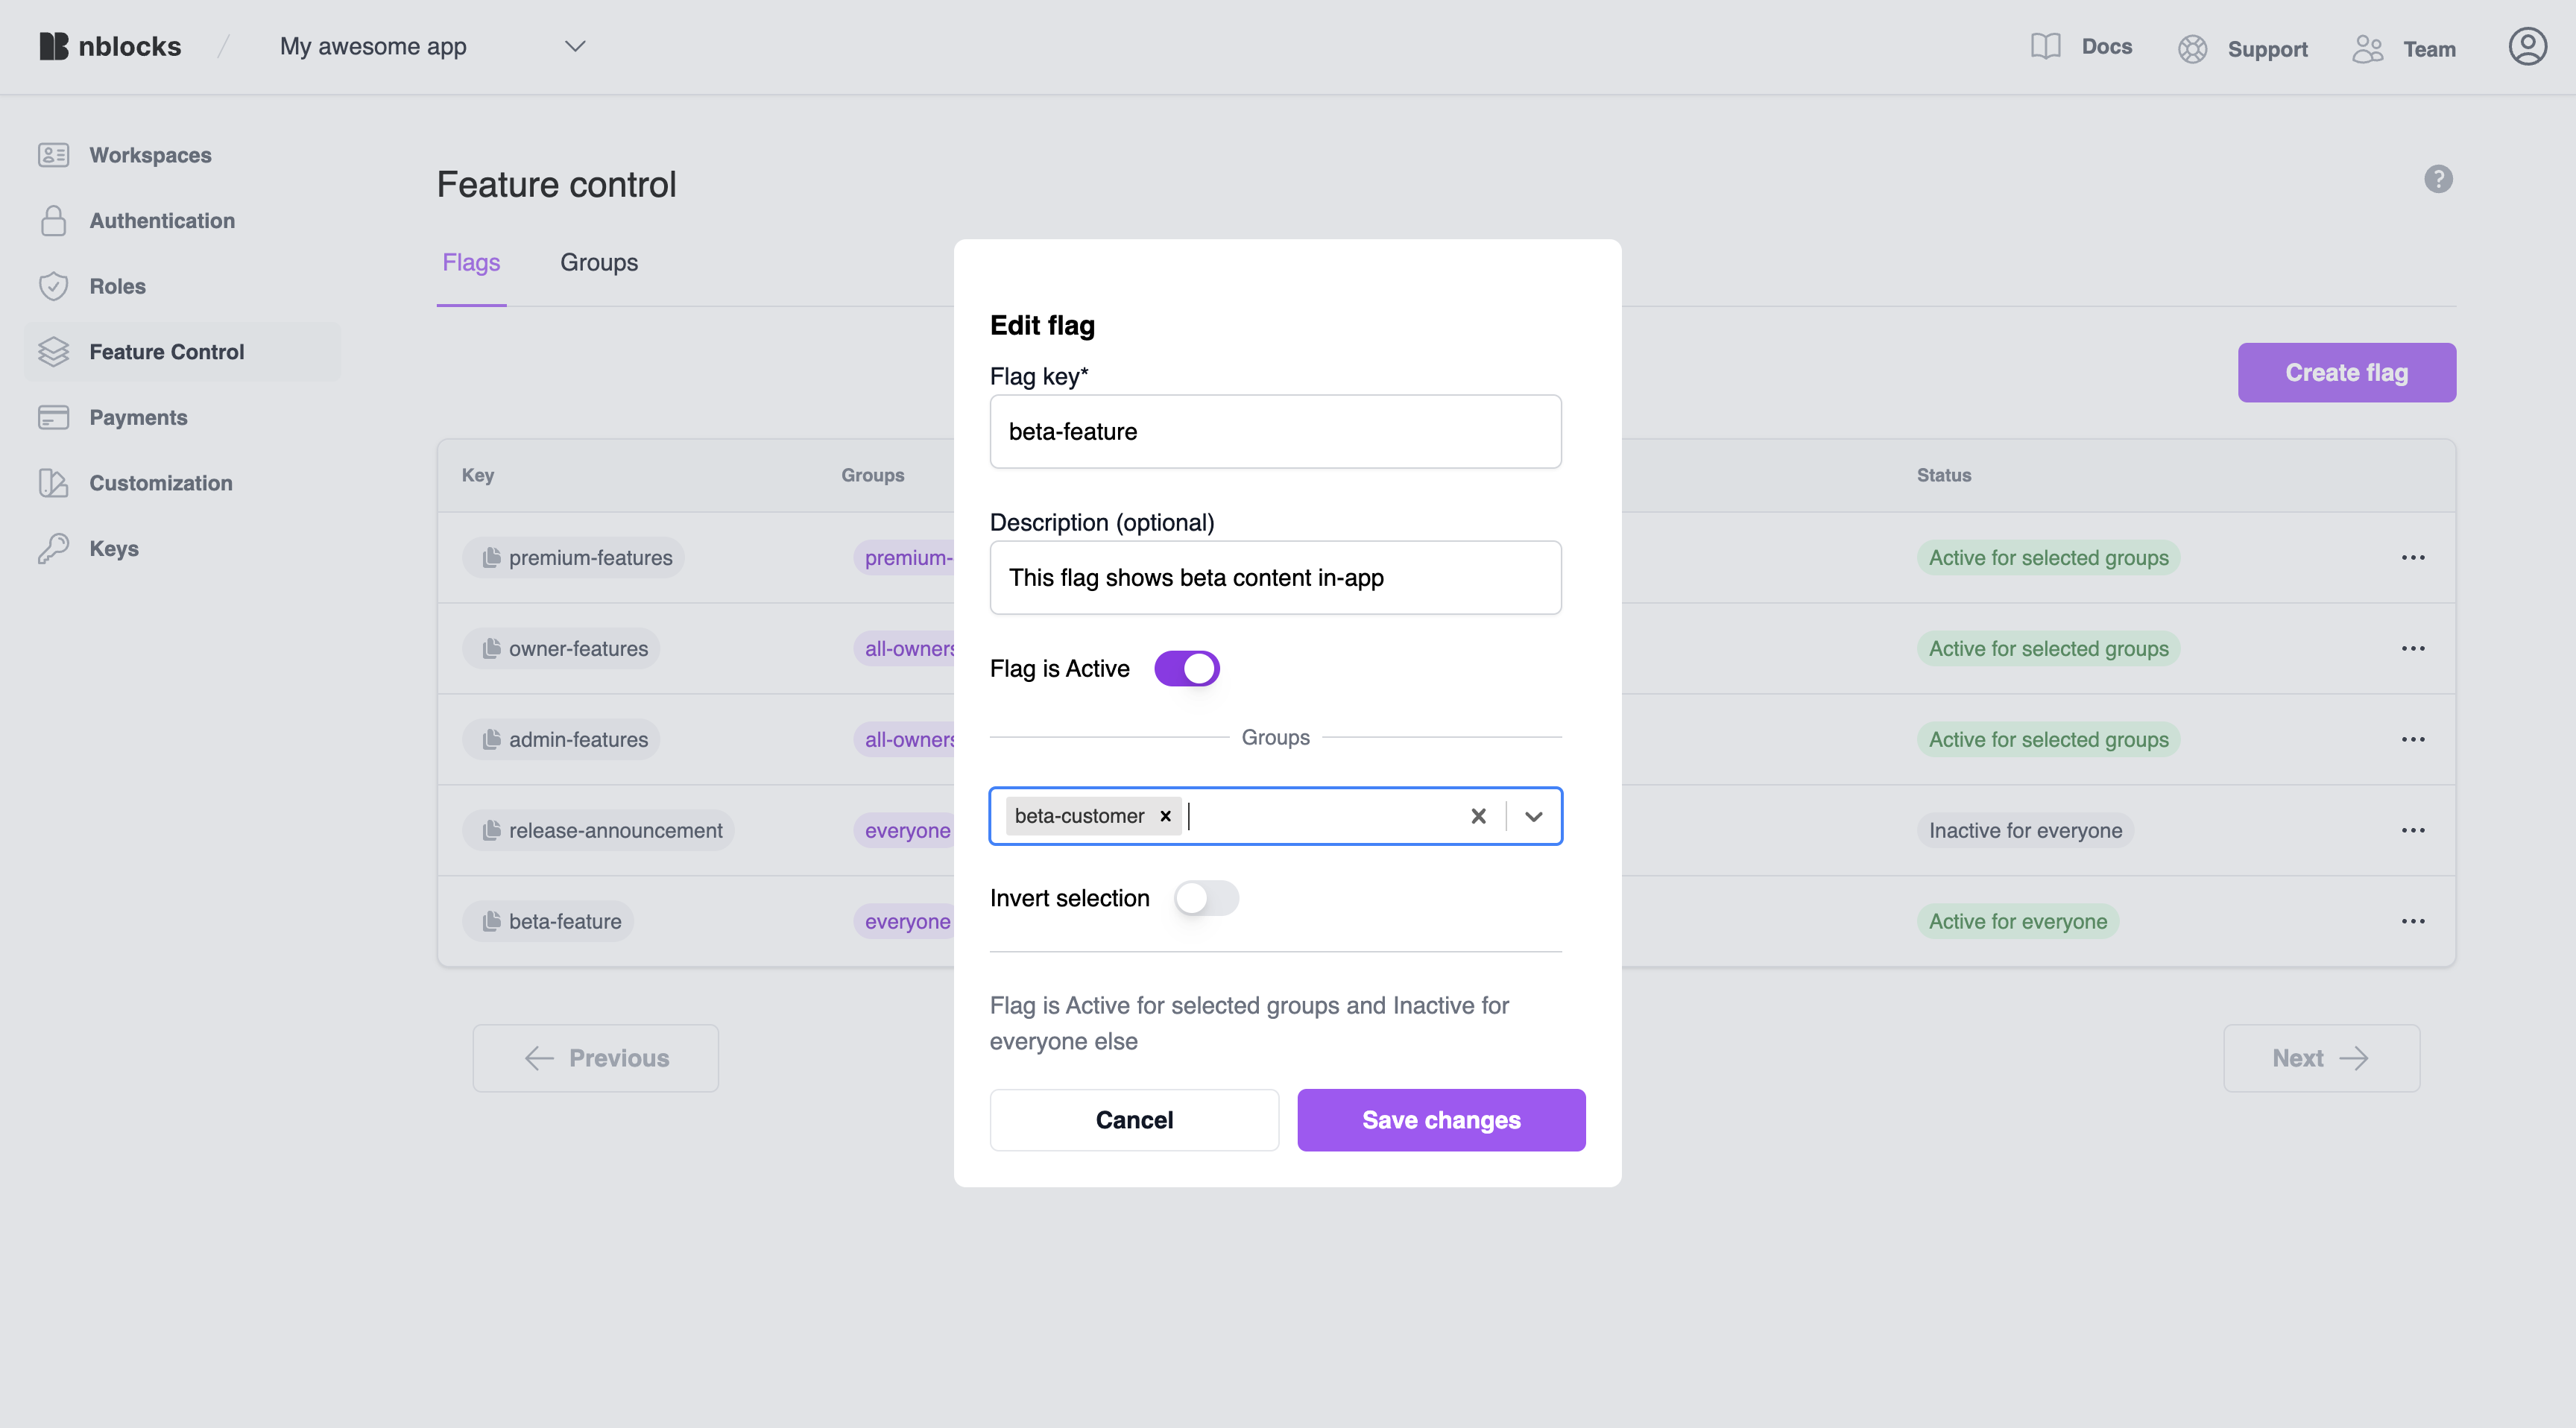
Step 3. Attach the group to the flag
Get back to the flags tab and click edit on the "beta-feature" flag we created earlier.
Add the "beta-customer" group and make sure that "Flag is active" is set to true.
This means that the flag will be evaluated to enabled: true if any of the groups match on the current user.
Testing it
We can now test this by logging into your app with the tenant we selected as target in the "beta-customer" group.
You should see the content that was set with the flag beta-feature. Now you can try creating flags for the other elements.
That's it, your now done with this quickstart
Can I provide other information than access token?
Instead of providing the user's access token you can send your own user context information to the evaluation api.
We recommend you to send as much information as possible from start for a flexible experience without the need for re-releases while you add more flags and conditions.
We've simplified this by defining a base structure of what information to send so you can more easily build your groups and conditions in Nblocks Admin.
The context object contains three areas, user, tenant and device. Each one of them reflect different traits and holds predefined relevant properties that you can assign.
Additionally, there's a forth property custom which is a map that allows developers to include any additional custom key-value pairs. Each key in the custom object should be a string, and the corresponding value should also be a string.
Here's an example:
{
    "user": {
        "id": "63d2ab029e23db0afb07a5a7",
        "role": "ADMIN",
        "name": "John Doe",
        "email": "john@doe.com",
        "key": "custom-user-trait"
    },
    "tenant": {
        "id": "66238feb99227400774266f5",
        "plan": "PREMIUM",
        "name": "My Workspace",
        "key": "custom-customer-trait",
    },
    "device": {
        "key": "iphone"
    },
    "custom": {
        "property1": "value1",
        "property2": "value2",
        "property3": "value2",
    }
}
This context object can be that can be sent to /flags/evaluate and /flags/bulkEvaluate.
Providing the access token will automatically resolve all values for user and tenant so you don't have to. Read more in the API reference
Instead of making multiple requests for each flag you can evaluate all flags in bulk once for better performance. See the API reference